
Assembly

Assembly Language Primer Manual
Introduction
Assembly language is a low-level programming language that provides direct control over the hardware of a computer. It allows programmers to write instructions that are executed directly by the CPU, making it powerful and efficient. This primer will take you from a novice understanding to a medium skill level in reading and understanding assembly language.
Basics of Assembly Language
Registers
Registers are small, fast storage locations within the CPU. Common general-purpose registers include:
rax,rbx,rcx,rdx: General-purpose registers.rsi,rdi: Source and destination index registers, often used in string operations.rbp,rsp: Base and stack pointer registers.r8tor15: Additional general-purpose registers in 64-bit mode.
Instructions
Instructions are the commands used to perform operations in assembly language. Here are some basic instructions:
- Data Movement Instructions:
mov dest, src: Move data fromsrctodest.push reg: Push a register value onto the stack.pop reg: Pop a value from the stack into a register.
- Arithmetic Instructions:
add dest, src: Addsrctodest.sub dest, src: Subtractsrcfromdest.inc reg: Increment a register value by 1.dec reg: Decrement a register value by 1.
- Bitwise Instructions:
and dest, src: Perform bitwise AND betweensrcanddest.or dest, src: Perform bitwise OR betweensrcanddest.xor dest, src: Perform bitwise XOR betweensrcanddest.not reg: Perform bitwise NOT on a register.shl dest, count: Shift left logical.shr dest, count: Shift right logical.
- Control Flow Instructions:
cmp op1, op2: Compareop1andop2.jmp label: Jump to a label.je label: Jump if equal.jne label: Jump if not equal.loop label: Loop to a label based on the value ofrcx.
Common Assembly Language Constructs
Looping
mov rcx, 10       ; Set loop counter to 10
.loop:
  ; Loop body
  dec rcx         ; Decrement counter
  jnz .loop       ; Jump to .loop if counter is not zero
Function Prologue and Epilogue
; Prologue
push rbp          ; Save base pointer
mov rbp, rsp      ; Set base pointer to stack pointer
sub rsp, 16       ; Allocate space on the stack

; Function body

; Epilogue
mov rsp, rbp      ; Restore stack pointer
pop rbp           ; Restore base pointer
ret               ; Return from function
Practical Examples
Example 1: Basic Arithmetic Operations
mov rax, 5        ; Load 5 into rax
mov rbx, 10       ; Load 10 into rbx
add rax, rbx      ; Add rbx to rax, rax now holds 15
sub rax, 2        ; Subtract 2 from rax, rax now holds 13
Example 2: Bitwise Manipulation
mov rax, 0x0F     ; Load 0x0F into rax
not rax           ; Perform bitwise NOT, rax now holds 0xFFFFFFFFFFFFFFF0
and rax, 0xFF     ; Perform bitwise AND, rax now holds 0xF0
Example 3: Conditional Logic
mov rax, 5        ; Load 5 into rax
cmp rax, 10       ; Compare rax with 10
jl .less_than     ; Jump to .less_than if rax < 10
mov rbx, 1        ; If not less than, set rbx to 1
jmp .end          ; Jump to end

.less_than:
mov rbx, 0        ; If less than, set rbx to 0

.end:
; Continue with the rest of the code
Advanced Topics
Using Div and Mod
mov rax, 20       ; Load 20 into rax
mov rbx, 3        ; Load 3 into rbx
xor rdx, rdx      ; Clear rdx
div rbx           ; Divide rax by rbx, quotient in rax, remainder in rdx
; rax now holds 6, rdx holds 2
Rotating Bits
mov rax, 0x12345678 ; Load a value into rax
ror rax, 4          ; Rotate right by 4 bits
Advanced Control Flow and Optimization
Let's continue with more advanced control flow mechanisms and optimization techniques in assembly language.
4. Conditional Jumps and Branching
In assembly language, conditional jumps are used to control the flow of the program based on the results of comparisons. Understanding and using these effectively is crucial for writing complex programs.
Common Conditional Jumps:
je label(Jump if Equal)jne label(Jump if Not Equal)jg label(Jump if Greater)jge label(Jump if Greater or Equal)jl label(Jump if Less)jle label(Jump if Less or Equal)
Example: Using Conditional Jumps
mov rax, 5        ; Load 5 into rax
cmp rax, 10       ; Compare rax with 10
jl .less_than     ; Jump to .less_than if rax < 10

mov rbx, 1        ; If not less than, set rbx to 1
jmp .end          ; Jump to end

.less_than:
mov rbx, 0        ; If less than, set rbx to 0

.end:
; Continue with the rest of the code
5. Loop Unrolling
Loop unrolling is an optimization technique that involves expanding the loop body to reduce the overhead of jumping and checking the loop condition. This can improve performance by minimizing the number of instructions executed in each iteration.
Example: Loop Unrolling
; Original loop
mov rcx, 4
.loop:
  ; Loop body (assuming some operation on an array)
  add rax, [rsi + rcx*4 - 4]
  dec rcx
  jnz .loop

; Unrolled loop
mov rcx, 4
.loop:
  add rax, [rsi + 0*4]
  add rax, [rsi + 1*4]
  add rax, [rsi + 2*4]
  add rax, [rsi + 3*4]
  sub rcx, 4
  jnz .loop
6. Function Calls and Parameter Passing
Understanding how functions are called and how parameters are passed is essential for writing modular code in assembly language. On x86-64 systems, the calling convention specifies how parameters are passed and how the stack is managed.
Example: Function Call Convention
; Caller function
mov rdi, 5        ; First parameter
mov rsi, 10       ; Second parameter
call my_function  ; Call the function

; Function definition
my_function:
  push rbp        ; Save base pointer
  mov rbp, rsp    ; Set base pointer to stack pointer

  ; Function body (parameters are in rdi and rsi)

  mov rsp, rbp    ; Restore stack pointer
  pop rbp         ; Restore base pointer
  ret             ; Return from the function
Detailed Breakdown of a Complex Example with Optimization
Let’s analyze and optimize one of the complex examples from the previous sections.
mov rcx, 0x40
.loop:
  mov rdx, rax
  shr rdx, 0x1
  or rax, rdx

  mov rdx, rax
  shr rdx, 0x2
  or rax, rdx

  mov rdx, rax
  shr rdx, 0x4
  or rax, rdx

  mov rdx, rax
  shr rdx, 0x8
  or rax, rdx

  mov rdx, rax
  shr rdx, 0x10
  or rax, rdx

  mov rdx, rax
  shr rdx, 0x20
  or rax, rdx

  loop .loop
Step-by-Step Optimization:
- Combine Repeated Operations:
The repeated mov rdx, rax and or rax, rdx can be optimized by using fewer instructions.
- Remove Redundant Instructions:
Some of the mov instructions are redundant because the value of rdx is only needed for the shr and or operations.
Optimized Code:
mov rcx, 0x40    ; Loop counter set to 64
.loop:
  shr rax, 1     ; Right shift rax by 1
  or rax, rax    ; OR rax with itself to propagate bits

  shr rax, 2     ; Right shift rax by 2
  or rax, rax    ; OR rax with itself to propagate bits

  shr rax, 4     ; Right shift rax by 4
  or rax, rax    ; OR rax with itself to propagate bits

  shr rax, 8     ; Right shift rax by 8
  or rax, rax    ; OR rax with itself to propagate bits

  shr rax, 16    ; Right shift rax by 16
  or rax, rax    ; OR rax with itself to propagate bits

  shr rax, 32    ; Right shift rax by 32
  or rax, rax    ; OR rax with itself to propagate bits

  loop .loop     ; Decrement rcx and loop if not zero
Explanation:
- The
shrandoroperations are directly applied torax, eliminating the need for the intermediaterdxregister. - Each
oroperation effectively propagates the bits to the right, ensuring all bits to the right of the highest set bit are set. - The
loopinstruction decrementsrcxand repeats the loop untilrcxreaches zero, ensuring the entire sequence is applied multiple times.
Conclusion and Further Study
This primer has covered both basic and advanced topics in assembly language, including:
- Data movement and arithmetic instructions
- Bitwise operations and their advanced usage
- Looping constructs and conditional execution
- Function calls and parameter passing
- Optimization techniques like loop unrolling
By practicing these concepts and studying the provided examples, you can gain a deeper understanding of low-level programming and how to harness the power of assembly language for efficient and powerful code. Continue to experiment with different instructions and techniques to further enhance your skills.
Further Study:
- Experiment with Assembly on Your Own:
- Use tools like NASM (Netwide Assembler) or MASM (Microsoft Macro Assembler) to write and test your assembly programs.
- Debug and step through your assembly code using a debugger like GDB (GNU Debugger).
- Read Assembly Language References:
- Intel's and AMD's processor manuals provide detailed information on the instruction set and how to use it.
- Books like "Programming from the Ground Up" by Jonathan Bartlett or "The Art of Assembly Language" by Randall Hyde offer deeper insights.
- Join Communities:
- Participate in online forums and communities such as Stack Overflow, Reddit, or specialized assembly language forums to ask questions, share knowledge, and learn from others.
By continuing to practice and explore assembly language, you will become proficient in reading and understanding complex code, allowing you to optimize and write efficient programs that interact directly with the hardware.
Further Places to Practice Assembly Language
Practicing assembly language is crucial for mastering it. Here are some resources and methods to help you improve your skills:
Online Assembly Language Compilers and Simulators
- OnlineGDB (Assembler Mode)
- OnlineGDB offers an online assembler compiler where you can write, compile, and execute assembly code. It provides a simple interface and supports various programming languages.
- Rextester
- Rextester is an online tool that supports assembly language. You can write and run assembly code directly in your browser.
- Assembly Language Simulators
- Emu8086: A popular 8086 microprocessor emulator that allows you to write and simulate assembly code. It provides a comprehensive learning environment for beginners.
- Easy68K: An assembler and simulator for the 68000 series of microprocessors. It is widely used in educational environments.
Integrated Development Environments (IDEs)
- NASM (Netwide Assembler)
- NASM is a popular assembler for x86 architecture. You can download and install it on your system to write and assemble code locally.
- MASM (Microsoft Macro Assembler)
- MASM is an assembler for x86 architecture provided by Microsoft. It is integrated into Visual Studio, making it convenient for Windows users.
- Keil MicroVision
- Keil MicroVision is an IDE for ARM-based microcontrollers. It includes an assembler and a simulator, making it a great tool for practicing assembly language on ARM architecture.
Books and Online Courses
- Books
- "Programming from the Ground Up" by Jonathan Bartlett: A great book for beginners that introduces assembly language programming.
- "The Art of Assembly Language" by Randall Hyde: A comprehensive book that covers advanced topics and provides practical examples.
- Online Courses
How to Practice Learning Assembly Language with ChatGPT
Practicing assembly language with ChatGPT can enhance your learning experience. Here’s how you can make the most of it:
- Ask for Explanations and Clarifications
- When you encounter a concept or instruction you don’t understand, ask ChatGPT to explain it. For example:
- "What does the
xorinstruction do in assembly language?" - "Can you explain how the stack works in assembly?"
- "What does the
- When you encounter a concept or instruction you don’t understand, ask ChatGPT to explain it. For example:
- Get Help with Code Examples
- Share snippets of your assembly code with ChatGPT and ask for help. For example:
- "Can you help me debug this assembly code?"
- "What is wrong with this loop in my assembly program?"
- Share snippets of your assembly code with ChatGPT and ask for help. For example:
- Request Detailed Breakdowns
- Ask ChatGPT to break down complex examples step-by-step. For example:
- "Can you explain what this assembly code does line by line?"
- Ask ChatGPT to break down complex examples step-by-step. For example:
- Explore Advanced Topics
- Ask ChatGPT to introduce you to more advanced topics or provide examples. For example:
- "How can I optimize this assembly code?"
- "What are some advanced bitwise operations I can use in assembly?"
- Ask ChatGPT to introduce you to more advanced topics or provide examples. For example:
- Practice Problem-Solving
- Provide ChatGPT with problems to solve or ask for practice problems. For example:
- "Can you give me a challenge to practice loops in assembly language?"
- "How would I write an assembly program to calculate the factorial of a number?"
- Provide ChatGPT with problems to solve or ask for practice problems. For example:
- Simulate Real-World Scenarios
- Ask ChatGPT to simulate real-world programming scenarios. For example:
- "How would I write an assembly function to handle string concatenation?"
- "Can you show me how to set up an interrupt service routine in assembly?"
- Ask ChatGPT to simulate real-world programming scenarios. For example:
- Learn from Iterative Feedback
- Share your progress and ask for iterative feedback. For example:
- "Here’s my current solution for this problem. How can I improve it?"
- "What are some common pitfalls to avoid in this type of assembly programming?"
- Share your progress and ask for iterative feedback. For example:
By using ChatGPT in these ways, you can create an interactive and dynamic learning environment that adapts to your needs and helps you progress from a beginner to a medium skill level in assembly language programming.

Some fun:
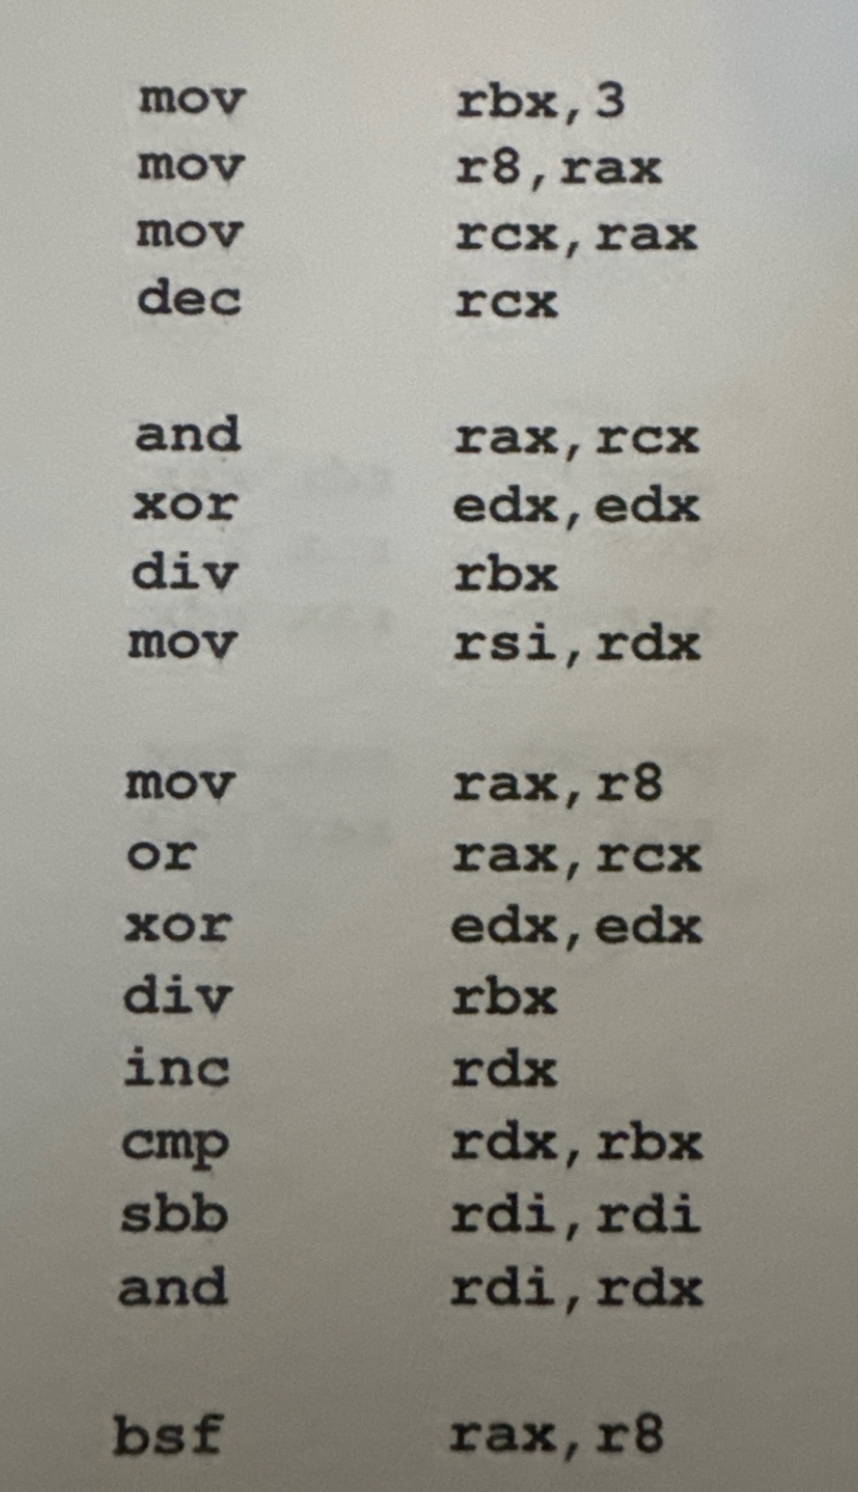
The image contains the following assembly language instructions:
mov rbx, 3
mov r8, rax
mov rcx, rax
dec rcx

and rax, rcx
xor edx, edx
div rbx
mov rsi, rdx

mov rax, r8
or rax, rcx
xor edx, edx
div rbx
inc rdx
cmp rdx, rbx
sbb rdi, rdi
and rdi, rdx

bsf rax, r8
Here's the breakdown of these instructions:
mov rbx, 3:- This moves the value
3into therbxregister.
- This moves the value
mov r8, rax:- This moves the value in the
raxregister to ther8register.
- This moves the value in the
mov rcx, rax:- This moves the value in the
raxregister to thercxregister.
- This moves the value in the
dec rcx:- This decrements the value in the
rcxregister by 1.
- This decrements the value in the
and rax, rcx:- This performs a bitwise AND operation between the value in
raxand the value inrcx, storing the result inrax.
- This performs a bitwise AND operation between the value in
xor edx, edx:- This clears the
edxregister by XORing it with itself, setting it to 0.
- This clears the
div rbx:- This divides the combined value in
rdx:raxbyrbx(which is 3), storing the quotient inraxand the remainder inrdx.
- This divides the combined value in
mov rsi, rdx:- This moves the remainder from
rdxintorsi.
- This moves the remainder from
mov rax, r8:- This restores the original value of
raxfromr8.
- This restores the original value of
or rax, rcx:- This performs a bitwise OR operation between the value in
raxand the value inrcx, storing the result inrax.
- This performs a bitwise OR operation between the value in
xor edx, edx:- This clears the
edxregister by XORing it with itself, setting it to 0.
- This clears the
div rbx:- This divides the combined value in
rdx:raxbyrbx(which is 3), storing the quotient inraxand the remainder inrdx.
- This divides the combined value in
inc rdx:- This increments the value in
rdxby 1.
- This increments the value in
cmp rdx, rbx:- This compares the value in
rdxwith the value inrbx(3), setting the processor flags based on the result.
- This compares the value in
sbb rdi, rdi:- This subtracts the value in
rdifrom itself, minus the borrow (carry flag), effectively settingrdito 0 if the carry flag is clear and to -1 if the carry flag is set.
- This subtracts the value in
and rdi, rdx:- This performs a bitwise AND operation between the value in
rdiand the value inrdx, storing the result inrdi.
- This performs a bitwise AND operation between the value in
bsf rax, r8:- This finds the index of the least significant set bit in
r8and stores the index inrax. Ifr8is zero,raxis undefined.
- This finds the index of the least significant set bit in
Why this might be fun:
- Bitwise Operations: This snippet showcases several bitwise operations (AND, OR, XOR) and how they can be combined with arithmetic operations.
- Division and Remainder: The use of the
divinstruction highlights how division and remainders can be handled in assembly language. - Flag Manipulation: The use of
sbbandcmpdemonstrates how processor flags are used in conditional operations. - Bit Scan Forward: The
bsfinstruction introduces bit scanning, a useful operation for finding specific bit patterns.
Overall, this snippet is an engaging example of how various assembly language instructions can be used to perform complex operations, demonstrating the power and flexibility of low-level programming.
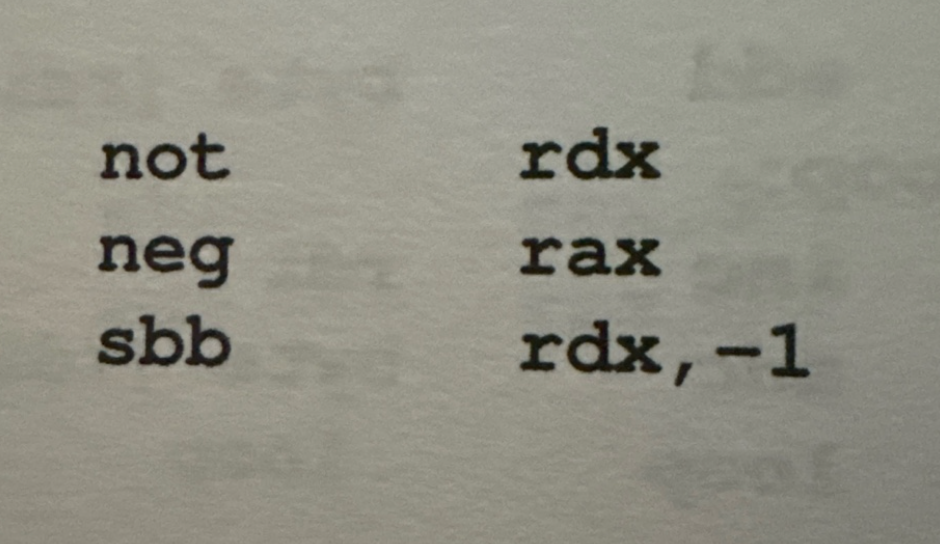
This image contains the following assembly language instructions:
not rdx
neg rax
sbb rdx, -1
Here's the breakdown of these instructions:
not rdx:- The
notinstruction performs a bitwise NOT operation on the value in therdxregister, flipping all the bits. Each 0 becomes 1 and each 1 becomes 0.
- The
neg rax:- The
neginstruction negates the value in theraxregister, effectively changing its sign by taking the two's complement.
- The
sbb rdx, -1:- The
sbb(subtract with borrow) instruction subtracts the value-1fromrdxand subtracts 1 more if the carry flag (CF) is set. The result is stored inrdx.
- The
Let's consider what these instructions do together:
- Suppose
rdxinitially holds the valueyandraxholds the valuex. not rdxwill change the value inrdxto~y(the bitwise NOT ofy).neg raxwill change the value inraxto-x.sbb rdx, -1will subtract-1(which is equivalent to adding 1) fromrdx, and also subtracts 1 if CF is set.
Why this might be fun:
- Bitwise Operations: The use of the
notinstruction introduces bitwise manipulation, which is a fundamental concept in low-level programming. - Negation: The
neginstruction is straightforward but critical for understanding how negative numbers are represented in binary (two's complement). - Carry Flag Usage: The
sbbinstruction’s use of the carry flag adds complexity and demonstrates how flags are used in arithmetic operations.
Overall, this snippet is another intriguing example of various low-level operations and how they interact, showcasing the nuances and potential complexity of assembly language programming.
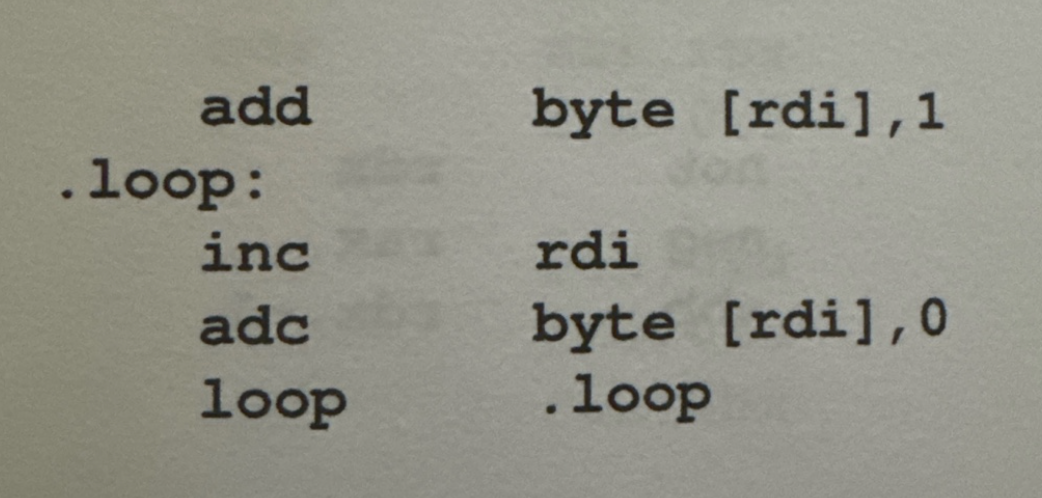
This last sample code picture contains the following assembly language instructions:
add byte [rdi], 1
.loop:
inc rdi
adc byte [rdi], 0
loop .loop
Here's the breakdown of these instructions:
add byte [rdi], 1:- This instruction adds the value
1to the byte located at the memory address pointed to by therdiregister.
- This instruction adds the value
.loop::- This is a label named
.loop. Labels are used to mark locations in the code that can be jumped to.
- This is a label named
inc rdi:- This increments the value in the
rdiregister by 1.rdiis often used as a pointer in memory operations.
- This increments the value in the
adc byte [rdi], 0:- The
adc(add with carry) instruction adds the value0to the byte located at the memory address pointed to byrdi, plus the carry flag (CF). If CF is set, it adds 1 to the byte at[rdi].
- The
loop .loop:- The
loopinstruction decrements thercxregister and jumps to the.looplabel ifrcxis not zero, creating a loop that continues untilrcxreaches zero.
- The
Putting it all together, this sequence performs the following operations:
- Increment the byte at the address pointed to by
rdi. - Enter a loop where it:
- Increments the
rdipointer to point to the next byte in memory. - Adds 0 to the byte at the new address pointed to by
rdi, including the carry flag if it is set. - Decrements
rcxand continues looping untilrcxreaches zero.
- Increments the
Why this might be fun:
- Memory Manipulation: This code manipulates memory byte-by-byte, which is a fundamental concept in low-level programming and can be interesting to explore.
- Carry Flag Usage: The use of the carry flag in the
adcinstruction introduces an additional layer of complexity, as the carry flag's state affects the operation. - Looping and Pointer Arithmetic: The code combines looping with pointer arithmetic, demonstrating how loops and pointer increments can be used to traverse and manipulate memory.
Overall, this snippet showcases several core concepts of assembly language programming, including direct memory access, pointer arithmetic, and the use of the carry flag. It’s a playful and educational example of how low-level code can be written to perform operations on memory.


Member discussion